Water Rights Mapping Tool User Guide
Overview
The Water Rights Mapping Tool provides access to water rights information as well as a number of other
geographic tools. Other datasets are provided to help with supplementing
research about a water right, such as political boundaries, water availability, and rule boundaries.
For more information about these datasets, please review the "Understanding the Data."
To gain a basic understanding of water rights, please review
Water Rights in Oregon publication.
For the formal definitions of water resources terms, please review the
Oregon Administrative Rules.
Navigation
Zoom Options:
Hover over any tool to find it's name. There are several ways to zoom and pan to navigate this mapping tool:
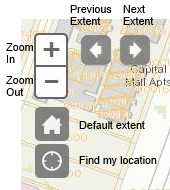
a) Hold the shift-key and drag the mouse over an area. (Red box should show).
b) Use the mouse wheel forward and back.
c) Use the (+) or (-) on the Navigation tool.
d) Use the Home icon (Default extent) to go to the full extent of Oregon.
e) Use the Find My Location icon to zoom to your current location. This is more applicable to mobile devices.
f) Use the Previous or Next Extent arrows.
g) Use the search tool (see below).
Pan Options:
Hold down the mouse key and drag the mouse across the screen. For mobile devices, simply touch the screen and drag.
Search By Location:

Zoom to Location
Enter a name or address in the Zoom to Location box. This search tool
uses a worldwide database, so you will need to include the state.
(For example: Burns, OR; Mount Hood, OR; Benton County, OR). Full addresses can be used (For example: 725 Summer St NE, Salem, OR)
Latitude and longitude may also be entered in the format: Longitude,
Latitude in decimal degrees. (For example, -123.000001, 45.000001) However a point will not be indicated
on the map. To mark a point on the map, use the Zoom to Latitude/Longitude tool described below.
Other Search Options
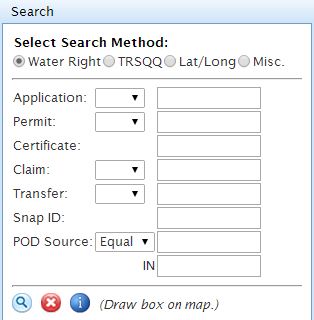
Select from the radio button any one of the following search methods.
Zoom to Water Right
Type in the file identifier to find a water right.
Water right information will appear in the table at the bottom of the screen.
The water right will be hightlighted on the map.
Once records are found, the number of records is displayed and the records are shown in the tables below.
Features of the table:
- Individual records may be highlighted by selecting the ID (select)
- Additional searching can be done by using the "Searching..." tool.
- Use the "Reload" to resize or reload the table.
Search Water Rights by River Mile
In 2015, a new search tool was added for water rights called Water rights by River Mile. There is a simple search and an advanced search.
Simple Search
Select a direction: Upriver, downriver or two points on the same stream. Select if you'd like to search the tributaries or not.
Zoom in on the map and click the Start button. Then click on a stream on the map. Streamcoded streams should display as a thicker blue line.
If you have selected two points, click on the End button then click on the same stream upriver on the map.
The water rights associated with that point, direction and streamcode will be selected based on the snp_id.
This means that if a POD is on the stream, all PODs and POUs with the same related id will be selected.
Advanced Search
This search works in a similar way as the Simple Search. More options are available however, such as Water Type, Water Use, Day in the Year, and Priority Date ranges.
In the Advanced Search, you have the option to select all the snaps (PODs and POUs) or you may select only the PODs associated with the streamcode. You may also select PODs within a distance
of the streamcode. If you choose this option, the PODs are selected by their pod_location_id (and not the snp_id), but the POUs will continue to be selected by the snp_id.
Since this is a new search feature to OWRD, please report any errors to
wriserror or contact GIS Coordinator if you have questions about your results. Please make
note of the coordinates and the options you selected so we may better troubleshoot the error.
Zoom to Township/Range/Section
Type in the township and range. Section is optional.
Zoom to Latitude/Longitude
Allows for entering latitude and longitude in degrees, minutes, sections (DMS) or decimal degrees (DD).
Longitude does not have to have the (-) in front of it.
Zoom to miscellaneous
List of miscellaneous other queries. This includes the searching for gaging stations by number or by name.
For more information on gaging stations, use the "Identify Non-Water Right Features" tool and view the
results under the "Hydrography" tab.
Icon Definitions
 |
Run the search request |
 |
Clear the request |
 |
Click on the map to identify |
 |
Zoom to Location |
 |
Identify with a Pop-up Report |
 |
Buffer a Point |
Identify Non-Water Right Features
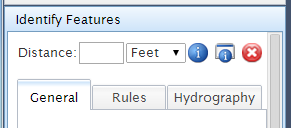
The Identify Features tool queries many datasets to find their attributes for a given point.
If a buffer is needed, it can be added in units of feet or miles.
Please note, however, the search will be slower. There is a limit of a 5 mile (26,400 feet) radius for the
buffer search. The buffer distance is indicated in the marker point on the map.
There are two views of the Identify Features. Option 1: Simple identify point on map.
Option 2: Similar, but provides a pop-up report that can be printed. Pop-ups will need to be enabled for this site
for this to work. Option 2 also provides sources and dates of the data used.
Tools
Create Buffer Point:
This tool creates a buffer around a point.
Enter a distance and select a unit of linear measurement. Click the Create Buffer icon.
Next, select a point on a map.
Traverse by Measure Distance (ft):
This tool create a traverse from a starting point to a second point, as determined by distance in feet and direction.
Traverse by Bearing and Distance:
This tool create a traverse from a starting point to a second point, as determined by bearing and distance.
Tool Pop-outs
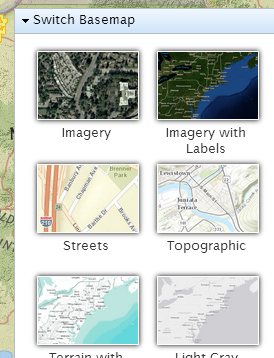
Switch Basemap
The Switch Basemap options allows changing of the basemap. The default is "Topographic". Other options include:
- Imagery
- Imagery with Labels
- Streets
- Topographic
- Terrain with Labels
- Light Gray Canvas - nice for muting the background with some detail remaining
- National Geographic - nice for a colorful basemap
- Oceans
- OpenStreetMap - nice for seeing urban areas and streets
- USA Topo - scanned images of the USGS topographic maps
- Google Road
- Google Satellite
- Google Hybrid
Most of these basemaps are provided by ESRI web map services. Dates and sources for these basemaps are
subject to change at any time and are not within the control of OWRD. The three Google maps should be used
sparingly, as the license with Google only provides a limited number of views.
Once a selection has been made, close the menu by clicking the blue bar at the top again.
Measurement
It is important to note that the tools for measuring are toggles. When you turn a tool on, it will stay on until
you click the tool again to turn it off. If you do not turn off the tool, it will continue to measure when
you return to the map to do other tasks, such as panning.

There are three measurement tools. From left to right, Area, Distance, or Location. You have the option to change units of
measurement. To use:
- Click on the Measurement task bar to open the Measurement tool
- Click on the tool icon: Area, Distance or Location (hover over the icon to find the name of the tool)
- Click on the map
- Double click on the map to stop measuring area or distance
- Change units, if desired
- Note the results
- Click on the tool icon again to stop measuring
- Click on the blue Measurement task bar to close the Measurement tool
Helpful Tips
Time Saver
- For easy zooming, hold the shift-key down and drag your mouse. A red box should appear.
Understanding Overlays
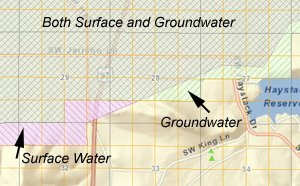
- Water rights overlap, particularly for surface and groundwater, making it a cartographic challenge to represent all of the information.
Surface water is mapped in purple with an upper left to lower right diagonal and groundwater is
mapped in green with a lower left to upper right diagonal. When they overlap,
it may give a "gray" appearance. Note the diagonal direction for the water right to help
determine the type of water right.
Max allowable records
- After doing a query search for a water right, you may see a message of "(Count 500 - Max allowable records)".
This message is indicating that a maximum of 500 records can be found at any one time. This limit is set
so the application does not become overloaded. For example, if all the water rights for the entire state
were accidentally selected. The map will zoom to a consistent, viewable scale for a handful of water rights.
If you have selected many water rights (500 records), you may need to zoom out to see all of the selected rights.
IPADS: Notes
- In order to use Option 2 of the Identify Non-Water Rights Features, pop-ups must be enabled.
To do this, open up the "Settings", "Safari". Turn off the "Block Pop-ups" option. When
you use the tool, it will ask you if you want to allow pop-ups from this website. Select "Allow".